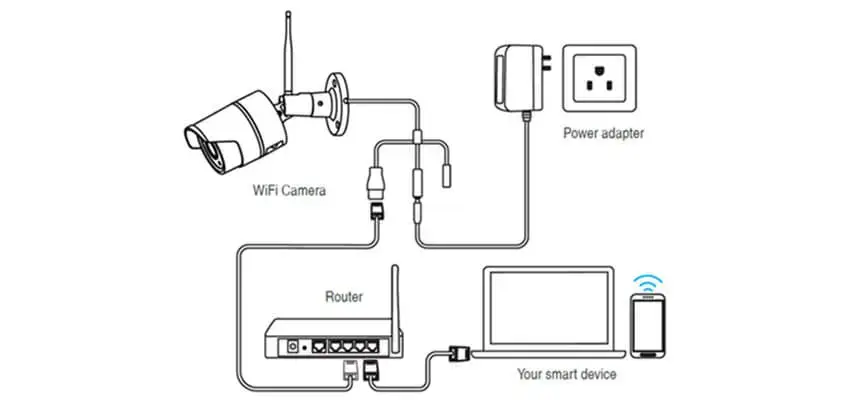
CCTV camera connection to your mobile phones, computers, TVs, DVR/NVR, etc.
May it is for your home or office, it’s a given fact that security is truly a necessity. There will surely be no objections and doubts about this statement, considering that safety is also one of the basic needs as per Maslow.
Fortunately, there are a lot of ways on how you can build security for yourself, your space, and everyone else that you’re with. This can be done through simple practices. For an upgraded method, you should highly consider CCTV cameras. It’s effective and easily accessible.
Setting CCTV cameras up, however, can be a little complex. You need to know the rights and wrongs of CCTV camera connection before you can enjoy full security benefits. To make learning easier for you, we’re going to walk you through everything you need to know in the following sections.
Contents
CCTV Security Camera Connection Types
Before we start, let us first walk you through the basic CCTV security camera connection types and basis. It’s important that you’re fully acquainted with this before moving on to the step-by-step guide. Doing so will help you avoid being confused throughout the tutorial.
To start, here is a reference:
- Coaxial Cables – Coaxial cables are the easiest ones to install because it fits both small and large CCTVs. It’s also commonly used because of shielding and protective copper-based qualities. Using this isn’t limited to a specific place so that it can be for both indoor and outdoor CCTVs.
- Video Power Cables – Video power cables, also known as Plug and Play, are a viable option if you’re looking for cables that are affordable, user-friendly, and easy to install. This is best for CCTVs that don’t require a very lengthy cable connection.
- Siamese Cables – If you plan on installing several CCTV cameras, then Siamese cables will be perfect. These consist of dual wires, which assure better signal and interference. Thus, even when monitoring several security videos, you can still expect clear screenplays.
- Optic Fiber Cables – For offices and workplaces, connecting CCTVs through optic fiber cables is the best choice. These cable types provide high levels of sugar and transmission, which can cater to more cameras while still retaining playback quality.
- RG-59 – Now, for residential CCTV cameras, using RG-59 cables is the answer. With super gas-injected insulation, this ensures a relatively good signal for apartments, flats, and even 2-story homes.
In choosing a cable and overall connection type, take the purpose of the CCTV into account and where you plan on placing it long-term. You can finish the IP camera configuration and connection job within just several minutes.
CCTV Camera Connections: Step-by-Step Guide
To connect your security camera to your smartphone, you will need to know the specific application that your CCTV system works with. You can usually ask the brand or seller where you got the camera/s from about this.
Check the below step-by-step guide to hook up your security cameras to your devices.
- How to Connect Your Security Cameras to Smartphones
- How to Connect Your CCTV Surveillance Cameras to TVs
- How to Hook up Your Cameras to Mac/Windows Computers
- How to Link Your CCTV Security Cameras to Your DVR/NVR
We’ve included the most common devices you’ll need for security camera connection and setup.
And if you would like to hook up your cameras to other devices that are not listed here, please leave them in the comment below, we’ll add a specific guide in this post for you.
1. How to Connect CCTV Security Cameras to Your iPhone or Android Mobile Phones
Before you dive into the CCTV camera connection with mobile phones, you are gonna need to prepare the below items:
- An iPhone or Android smartphone
- A security camera
- A DVR & BNC connector (for analog cameras)
- CCTV security camera power adapters
- Network cables & power cables
- Router
If you opt to wifi security cameras, you just need your phone and the camera.
Here we take ZOSI C190 Pro wifi security camera as an example to show you the whole CCTV camera mobile setting & connection process.
Once you know the app, below are the steps that you should follow:
- Install the ZOSI App on your smartphone devices.
- Open the app, and look for the “Add Camera” button or anything similar. Doing so will prompt the app to scan for available and compatible cameras.
- Click your CCTV camera from the app’s list. This will automatically add the device to the app and will let you enable live viewing.
- This is optional, but if you’re particular about the settings of your CCTV camera, then continue to modify it before proceeding to live views. This includes setting alerts, motion detection features, and likes.
The home IP security camera setup process on mobile phone is super easy. You don’t need to do any wire connection jobs at all. If you want security cameras without installation, try this one.
You can also watch the below video to get the complete guide for ZOSI C190 Pro camera connection to mobile phones.
If you get a hi-tech CCTV camera, then there won’t be a problem with finding the right app for your system.
2. How to Connect Security Cameras to TV with/Without DVR or NVR
CCTV camera connection to TV enables you to get local live streaming even without Internet access.
If you opt to an all-in-one security camera system with DVR or NVR, you can get 24/7 recording for your property when network is unavailable.
You can check the below steps for security camera hookup to TV with and without DVR/NVR separately.
How to Connect Security Cameras Directly to TV & VCR (Without DVR/NVR)
You’ll need to prepare the below stuff for the CCTV camera connection setup without DVR:
- A video security camera with RCA output jacks
- A TV
- A VCR
- RCA audio-video cables
- VHS tapes
- Power adapters
You can follow the below steps to hook up your security camera to TV & VCR for local live streaming and recording.
- Install the camera to the place you want to keep tabs on.
- Use an RCA cable to connect the camera to the VCR.
- Plug the camera into the power outlet with the power adapter.
- Use another RCA cable to connect the VCR to your TV.
- Adjust the TV and VCR into channel 3 or 4 to get the live streaming.
- Insert a VHS tape into the VCR, and then press the Record button to get video recordings.
Always keep all the devices running when you view live steaming from your TV.
The above steps apply to analog CCTV camera connection to TV without DVR.
If you want to view IP camera live streaming on TV without NVR, you’ll need the third-party device, such as NetcamViewer Monitor, which is specialized in CCTV camera connection to TVs with or without NVR.
The IP camera connection to TV without NVR can be realized via the HDMI (cable included) or on an analogue monitor via a separate analogue cable set in the package.
How to Connect CCTV Security Cameras to TV/Monitor with DVR/NVR
You’ll need to get the below items ready for your security camera system connection to a smart TV, like your Samsung, LG, LeTV televisions.
For DVR security camera systems:
- One or multiple analog security cameras
- A DVR
- An HDMI or VGA cable
- A TV or monitor
- Power adapters
- Coaxial cables and power cables
- BNC connectors
For PoE NVR security camera systems:
- A security camera or multiple PoE security cameras
- A PoE NVR
- An HDMI or VGA cable
- A TV or monitor
- PoE injectors
- Ethernet Cat 5/6 cables
For wireless NVR security camera systems:
- One or multiple WiFi security cameras
- A WiFi NVR
- Power adapter
- Extension cord (you’ll only need it when the power outlets are farther away than the camera cable can reach.)
- An HDMI or VGA cable
- A TV or monitor
Here we take ZOSI C182 PoE NVR system as a typical example to show you the steps of CCTV PoE camera system connection to a computer monitor.

C182 - 4K POE Surveillance Cameras Security Monitor Systems
- 4K Ultra HD
- Smart Person/Vehicle Detection
- Customize Detection Zone
- Starlight Night Vision
- 24/7 Video & Audio Recording
- Access Remotely & Flexibly
- Two Way Audio
PoE IP CCTV camera system cable connection diagram
- Install the camera(s) to the position you want.
- Use the Ethernet Cat 5/6 cables to connect the cameras to the NVR.
- Connect the NVR to your monitor or TV with the VGA/HDMI cable.
- Power the NVR with the power adapter.
- Turn on the TV or computer. The live streaming should appear on the screen.
You can watch the below video to see how to connect your security cameras to the TV or computer monitor with NVR.
The security camera systems with Ethernet Cat 5/6 cable connection are easier to install compared with the analog type, since the Ethernet cable can carry both power and data transmission. So you don’t need to run messy wires in or around your property.
You can also check this post written by ZOSI’s top editor, Emma, a DIY lover, to check the easiest way to connect security cameras to TV.
3. How to Connect Security Cameras to Computer or Laptop
Components you’ll need for CCTV camera connection to Windows computer, PC, Mac & laptop:
- Your WiFi or PoE security camera
- A power adapter for the camera
- Your computer (desktop or laptop)
- A network cable
Here we take ZOSI C296, with PTZ IP camera, to show you the security camera hook up to computer without an Internet connection.
C296 - Pan Tilt IP Security Cameras
- 4K Ultra HD/5MP Super HD
- Starlight Color Night Vision
- Pan & Tilt
- PoE/WiFi Connection
- Light & Siren Alarm
- Upgraded AI-Powered Detection
- 2-Way Audio
- Charge the camera with the power adapter.
- Connect the security camera to the computer or PC LCD monitor with the network cable.
- Find out the IP camera address on your computer. 1) Launch the ZOSI APP on your computer. 2) ZOSI Client will automatically scan the cameras in LAN and show you the default IP address of the cameras. You can also check this post to get more ways to find security camera IP address.
- Change your computer’s IP address to the same network prefix of your IP camera.
For example, in Step 3, you’ve got the IP camera IP address (192.168.177.100), and now you’ll need to change the computer’s IP address into 192.168.177.X. The number for ”X” ranges between 2 and 254.
Here we take Windows 10 as an example to show you the process of changing the computer’s IP address.
- Press Windows + R keyboard shortcut to open the Run box.
- Enter ”ncpa.cpl” and click ”OK”.
- Right-click your computer’s network adapter and click ”Properties”.
- Select your computer’s Internet Protocol Version and click ”Properties”.
- Select ”Use the following IP address” and change the IP address into 192.168.177.X.
Bingo! You’ve finished the CCTV security camera connected to a computer without Internet access.
You can click this post to get other 4 ways to connect your analog or IP security cameras and DVR/NVR systems to computers with or without Internet. This post is written by ZOSI’s chief editor, who’s been in the security camera field for over 10 years.
When you connect your security cameras to your computer with Internet access, you can simply make it done with the below steps. (Take ZOSI WiFi IP camera as an example.)
- Install the security camera to the position you want.
- Plug the WiFi camera to the power outlet.
- Download and launch the ZOSI Client on your computer. The client will scan and add the cameras automatically in LAN (when your computer and your camera are in the same local network).
4. How to Connect Your Security Cameras to DVR or NVR
IP security camera connected to DVR or NVR can be realized in 3 simple steps. You can get 24/7 video recording even without Internet with a complete all-in-one security camera system.
Components you’ll need for HD CCTV camera & kit connection to DVR or NVR:
- One or multiple wired or wireless security cameras
- A DVR or NVR
- Power adapters for both cameras and DVR/NVR
- Cables for the connection between cameras and DVR/NVR
Now items are ready, setup comes next. Here we take ZOSI wireless security camera system as an example to show you the process of hooking up security cameras to the NVR.
- Install the cameras to the places you want.
- Plug the wireless security cameras into the power outlet with the power adapters.
- Also, power the NVR with the power adapter.
The security cameras will communicate with the NVR via their proprietary network. In other words, they can work seamlessly once powering them on.
If you place the system within the WiFi range, the cameras and NVR will connect to the network automatically without any configuration.
You can download the software to your mobile phones or computers to get remote live streaming or connect the system to a PC or TV to get a local live view. (Please check the previous setup guides).
If you want to add more cameras to your 4 channel, 8 channel, or 16 channel DVR or NVR, you’ll need to do some basic setup jobs. Also, take ZOSI PoE NVR and IP cameras as an example.
- Log in to your NVR, and go to the IP channel.
- Select Auto Add, and click Scan so that all the cameras in the same LAN can be automatically shown on the list.
- If you never change the password of the IP cameras (i.e. the password of the IP camera is the default password), you can press Apply to add the new IP cameras.
CCTV Camera Connection Failed: Reasons & Quick Fixes
If you encounter security camera connection failure during your configuration, you can check the below solutions to fix the issues.
If you have any questions, please leave them in the comment below! We’ll add your questions in this list.
Q 1. IP Camera Loses Connection
My IP camera won’t connect to WiFi. IP camera keeps going offline! What should I do?
If your IP cameras have no Internet connection, you can try the below solutions to fix the issue.
Solution 1. Make sure your WiFi or PoE security cameras are powered.
Solution 2. Make sure there is no network signal interference.
Solution 3. Update the firmware and software.
Solution 4. Check if your router supports your security camera’s WiFi channel.
Check more solutions to IP camera WiFi not working in this post, written by ZOSI’s chief editor, who’s quite professional in WiFi field (with 10-year experience).
Q 2. Can’t Connect the DVR/NVR with My Mobile Phone Remotely
You can fix the ”DVR/NVR connection failed” issue with the following solutions.
Solution 1. Make sure your DVR/NVR is connected to the network.
Solution 2. Check if the DVR/NVR is powered.
Solution 3. Upgrade the software and hardware to the latest version.
Solution 4. Reboot your DVR/NVR.
You can check this post to get more solutions to security cameras not working.
If you have other questions or any ideas you wanna share, don’t forget to leave them in the comment below?
Conclusion
To wrap it up, remember that CCTV cameras are made differently depending on their brand. Some models don’t offer connectivity options to modern devices like newly-released smartphones and televisions. It’s recommended that you take a close look at the specs before purchasing and installing one.
Also, make sure that you also take note of troubleshooting tips. There may be some times where you have to double-check and redo the process to ensure the connection’s success.
Nevertheless, a seamless CCTC camera connection is essential because it means a good level of security for you.